The extended Surface Forces Apparatus (eSFA)
Contents
- Principle of the Surface Forces Apparatus (SFA)
- The extended Surface Forces Apparatus (eSFA)
- The optical Probe and the Point of Closest Approach (PCA)
Related Links
- Introduction to Multiple Beam Interferometry
- Advanced thin film interferometry
- Fast Spectral Correlation
- Instrumental drift
New
Principle of the Surface Forces Apparatus (SFA)
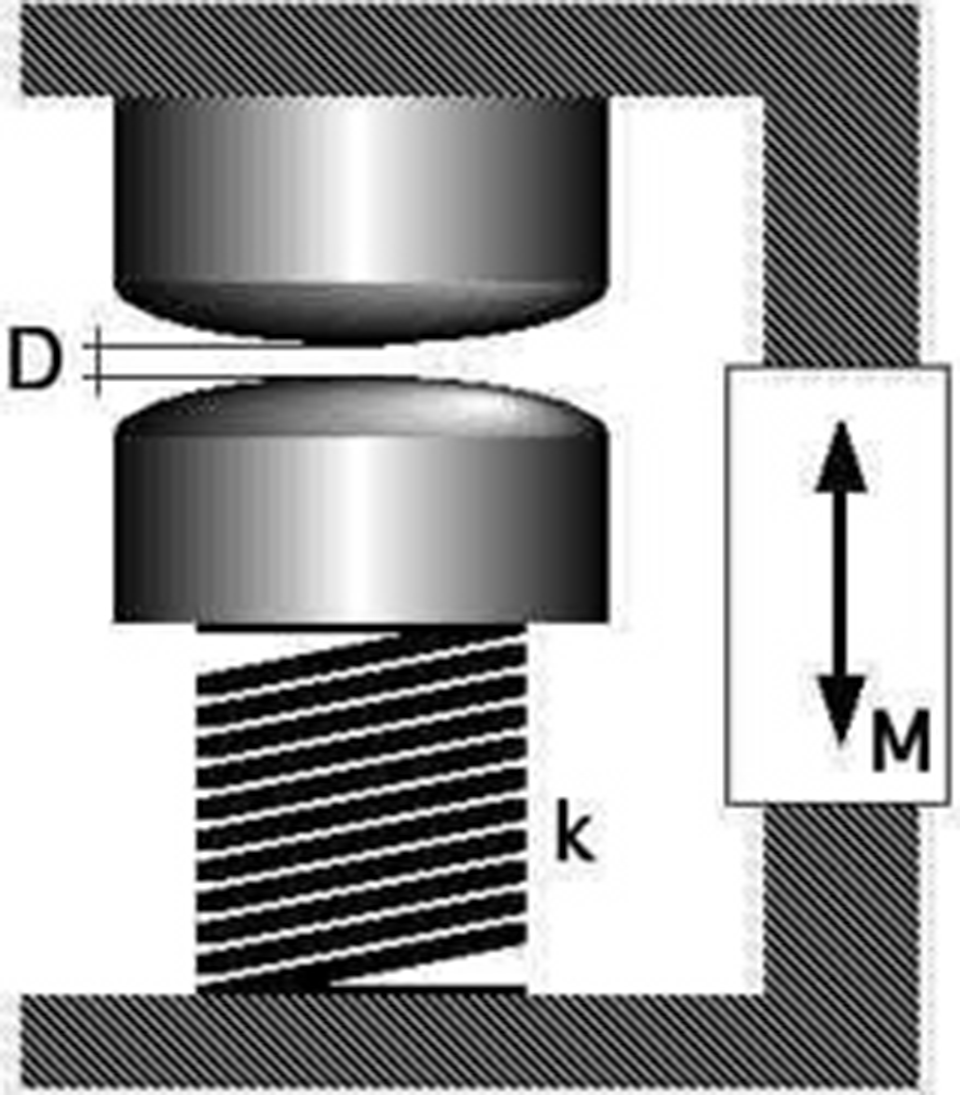
The Surface Forces Apparatus (SFA) is an instrument that can measure forces occuring between two curved surfaces. The two surfaces are cylindrically curved and oriented such that the cylinder axies are crossed at an angle of 90°. The shortest distance, D, between the two curved surfaces can be varied by moving the approach actuator by the amount, M. One of the two surfaces is mounted on a compliant spring with spring constant, k. When the surfaces are separated sufficiently, a motion of the actuator will result in an equal change in surface distance; i.e. M=D.
The situation is different when a surface force, F(D), deflects the spring at closer distances and D and M are thus no longer equal.
During an experiment one optically measures D(M) to be able to calculate the external force, F(D)=k*(D-M). A negative force means attraction and a positive force means repulsion. When the surfaces are in contact, they deform elastically to form a circular contact with a diameter of several 10µm. In such contact, D may vary only little, while the actuator continues to move. Then, the external force (or load), F is increased roughly proportional to k*M.
For the measurement, it is of utmost importance that M can be controlled very accurately and reproducibly. A well-designed mechanical approach mechanism is necessary to meet these requirements.
Common surfaces are 2-5µm thick sheets of mica, which are manually cleaved and glued onto transparent cylinder lenses after evaporation of a typically 55 nm-thick silver layer on the reverse side. The two silver layers are mirrors comprising the white light interferometer. Using Multiple Beam Interferometry (MBI), one can determine the distance between the surfaces. To this end, it is necessary to measure an optical zero when the mica surfaces are in direct contact. The measurement of the optical zero is essentially a determination of the mica substrate thickness.
A number of attachments have been developed for the SFA, which allow one to apply and measure oscillatory or linear motions in-plane and out-of-plane. The best known example is a lateral-force attachment, which can be used to study friction in the SFA.
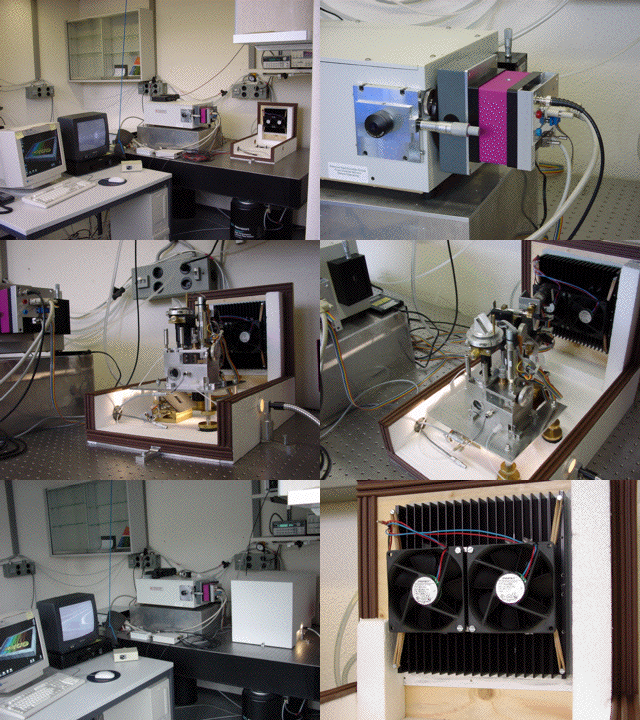
A selection of different SFA designs is depicted below:
The extended Surface Forces Apparatus (eSFA)
Many SFAs are operated manually. The extended Surface Forces Apparatus (eSFA) represents a fully automated version of the SFA3TM (Surforce, USA). Interference spectra are recorded automatically and at high speeds. Up to 150 interference fringes are tracked by the software and the distance is calculated in real time. At maximum speed, up to three distance measurements are made per second. This allows the motion of the surfaces to be monitored during adjustments and instrumental and thermal drift to be checked during instrument equilibration. For optimal conditions, the instrument is placed in an insulated enclosure that provides high thermal stability in a range from -10°C to +70°C. Two temperature sensors measure the temperature both inside the enclosure and inside the fluid cell of the SFA during experiments. When the cover of the enclosure is closed, a typical equilibration time of 10-16 hours is allowed before sensitive measurements are made.

eSFA Characteristics and Specifications
- high instrumental stability (typical drift rates dD/dt<50pm/min)
- precision temperature control with extended temperature range (typical stability dT/dt~2mK/h, range -10°C to +70°C)
- high-precision distance measurement using Fast Spectral Correlation (FSC) Interferometry (typical distance resolution: 25pm, range 0-100µm)
- full lateral scanning ability (lateral resolution ~1µm)
- accurate and straight forward determination of the point of closest approach (PCA)
- measurement of refractive index of very thin films using Fast Spectral Correlation (FSC) Interferometry
extended dynamic window (1 pm/s to 100µm/s) - full computer control for unattended batch-processing of repetitive measurements
Automated measurements with the eSFA are typically performed at night, without human presence. The eSFA control software (Acquisoft) allows us to program several different experiments in advance with predetermined timing. Several loading/unloading cycles (force-run) under various conditions can thus be programmed in advance. Already measured Acquisoft data files can be reloaded. They contain all necessary commands to exactly reproduce any experiment or sequence of experiments. The Acquisoft software has a modular architecture, which allows one to perform an unlimited variety of different experiments (e.g. drift-measurement, force-run, friction experiments...) in arbitrary sequence and under any conditions that are instrumentally accessible.
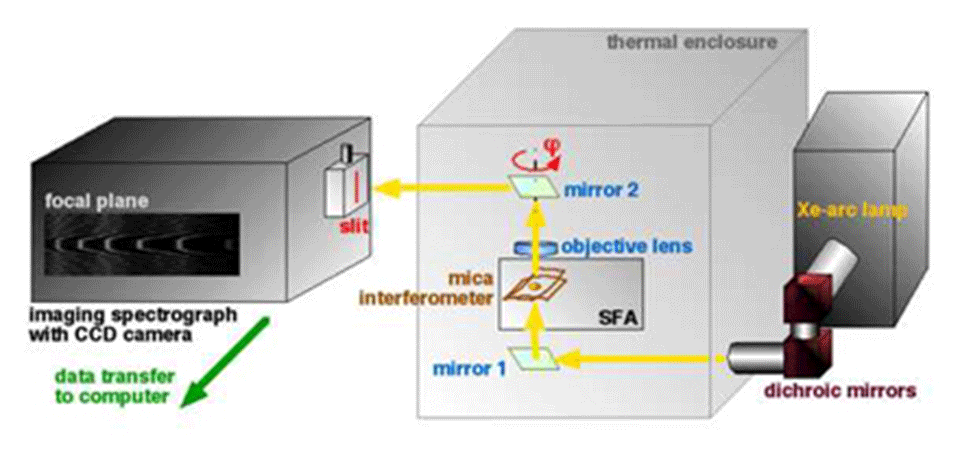
Several minimotors inside the thermal enclosure allow one to make fine adjustments of the optics while the enclosure remains closed. Light is coupled in from a 450Watt Xenon arc lamp or alternatively from a fiberoptic light source (not shown). To minimize unwanted heating inside the thermally stabilized instrument, IR components of the light are filtered out using two dichroic mirrors in series. This cold white light is then directed through a modified SFA3TM (Surforce, USA) where it is filtered by the interferometer (back-silvered mica surfaces). The emerging light is finally collected with an imaging lens and directed into an imaging spectrograph. The spectrum is recorded with a high-resolution CCD camera (5000 pixels, 7µmx7µm). The pixel information is transferred to the computer where the wavelengths of up to 150 fringes are determined simultaneously. The obtained set of wavelengths is used to calculate distance and/or refractive index between the surfaces. The numerical evaluation is based on Fast Spectral Correlation (FSC).
The optical probe and the Point of Closest Approach (PCA)
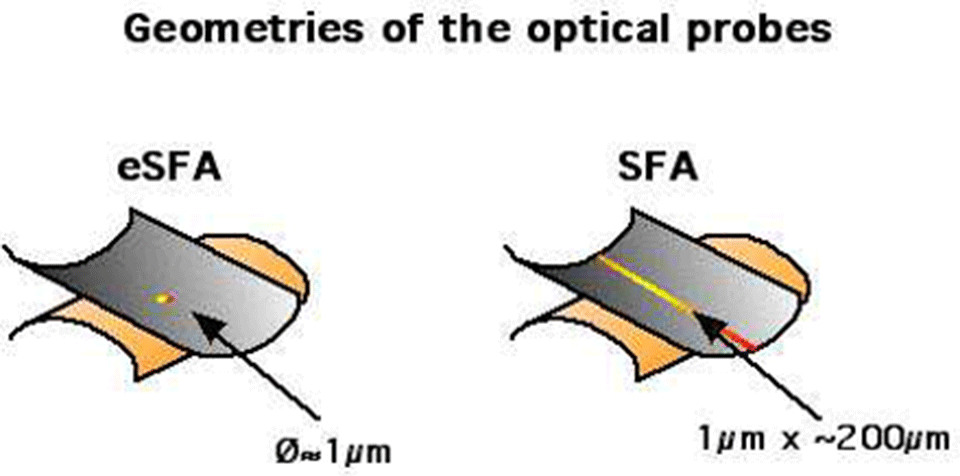
An important difference between automated and manual measurement of interference fringes is that the automated measurement is a local local measurement whereas the manual measurement determines the average fringe wavelength over a cross section of the flattened contact area. To better illustrate this difference, we have added Figure 5.
The automated measurement is local because only one (horizontal) line of the CCD camera may be evaluated at a time (see also figure 4), which corresponds indeed to a single point (x, y) on the surface. The size of the automated, point probe is approximately 1µm x 1µm and limited by the imaging optics. An optical point probe offers the possibility to use the eSFA as a scanning eSFA. Vertical motion of the linear CCD and a rotation of deflector mirror 2 effectively displaces the optical point probe in the two orthogonal directions x and y on the surface (Figure 4).
In the SFA, the distance measurement is used to calculate an effective surface force. It is important to note that the surface force is an integral quantity that involves the entire contact region, whereas the optical probe is either at a point (eSFA) or over a cross-sectional average (SFA). An consequence is that the optical probe must be adjusted to the center of the contact, which corresponds to the Point of Closest Approach (PCA) if the clindrically curved surfaces are not in contact. A frequently used method in the conventional SFA technique is to rotate mirror 2 until the flattened part of the fringes (i.e. contact diameter) appears maximal. Since the derivative of the contact diameter is zero around its maximum, the adjustment of the cross-sectional probe is manually only possible to within 5-10µm of the actual PCA. The situation is different with the eSFA, where one can scan the contact geometry in any orthogonal directions (e.g. x and y). Between 10 and 50 points are automatically measured to form a cross-sectional profile. Using two orthogonal scans one can readily determine both the lateral offset and the radius, R, of each cylinder via fitting of the real-space data. The offset is equal to the distance to the PCA. Both CCD vertical position and mirror 2 deflection are actuated using closed-loop feedback motor controllers, which allows for very precise positioning of the optics. We typically achieve a lateral accuracy <1µm of positioning the optical probe over the PCA and a relative error in fitting the cylinder radius <2%.


